Remote Programming
Introduction
This page describes setup and general best-practices for using a remote programming setup. For connection details and login credentials, please talk to someone from the software team.
Before getting started it’s useful to have an uderstanding of basic command line usage and tmux commands. Also, you’ll have to ask someone on the Slack what hardware is currently connected or set it up yourself. In the future we may have some standard way of determining current hardware setups.
Setting up the Hardware
If you require the use of UART TX (i.e. sending serial from your computer to the PCB), then the only hard requirement is that the RXD pin on the microcontroller must be directly accessible through a debugging header. The standard 4-pin UART header will not work because the PGM<->RUN mode switch disconnects RXD on the microcontroller during programming. However, since we have direct control over the Raspberry Pi GPIO, we can simply toggle the UART on the Pi before and after programming to get around this issue while developing remotely. Look for “TX” and “RX” labels on your debugging header to see if your board supports it. Remember to leave the PGM<->RUN mode switch in program mode to ensure that you can program remotely.
For example, in the case of the OBC PCB, you would use the TX and RX pins on the horizontal header across the south side of the board rather than the 4-pin header in the north-east corner.
Wired Connections
The Raspberry Pi requires a 5V power supply with at least ~1A of current capability. The official Raspberry Pi foundation recommends 2.5A to ensure that the board always has a steady power source. The Raspberry Pi also needs a wired ethernet connection, but otherwise can be run entirely headless.
We’ll be making use of the Pi’s GPIO header. An image of the standard 40-pin header used on all Raspberry Pi’s is included below for reference.
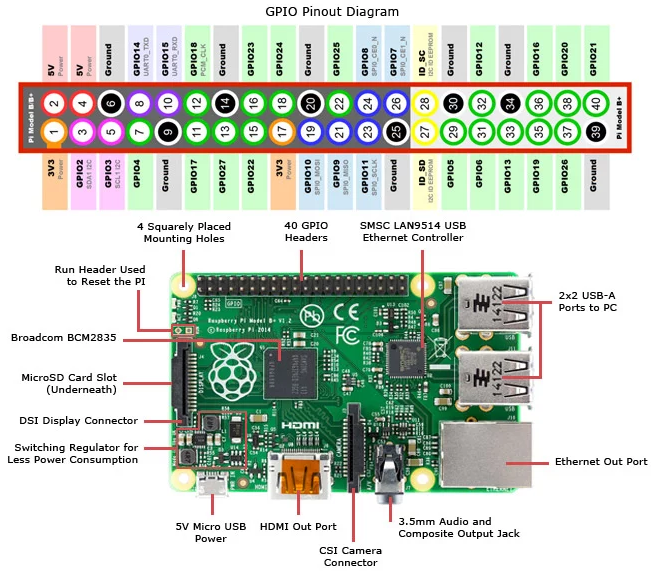
The Pi will be used to supply 3V3 and UART to the PCB. Connect jumper wires between 3V3 and GND on the Pi and 3V3 and GND on your PCB. In some cases, the inrush current will cause the Pi to restart. We recommend that you first shutdown the Pi safely using sudo shutdown now and disconnect the power before changing any of the hardware connections.
While you have the jumpers out, connect UART_TXD (GPIO14) to RX on your PCB and UART_RXD (GPIO15) to TX. This finishes the hardware setup.
Plug back in the Pi and check that it starts up normally. If the red LED on the Pi blinks during startup and seems to power cycle, this is probably because it’s power cycling. Something on your PCB (or the Pi itself) is drawing too much current during startup and the power adapter you’re using doesn’t have enough juice to keep the rail up. Disconnect your PCB and see if the issue goes away, or try using a different power adapter.
Getting Your Bearings
Log into the remote programming machine over SSH. By default, the user directory should contain a github directory. This folder is where you should checkout any GitHub repositories you’re developing on.
List out the tmux sessions using tmux ls to see if anyone else is currently using your machine. If you get something like error connecting to ... then tmux isn’t running and you’re safe to use the setup. If you do get a list of sessions, get in touch with whoever is using it and see if they’re still active.
Start a new session from the command line by calling tmux new -s <your descriptive session name> and make sure to include your own name in the title (e.g. dylan-obc-dev). This way if someone else logs into the machine (and follows these instructions) they’ll see your session and get in touch to see if you’re still using it.
While you should read up on available tmux commands, a few basic ones to get you started are:
| Ctrl+b % | Split your tmux pane vertically |
| Ctrl+b “ | Split your tmux pane horizontally |
| Ctrl+b o | Cycle through your active panes |
| Ctrl+b d | Detach your current tmux session |
| Ctrl+b $ | Rename your current session |
| Ctrl+b [ | Scroll through your terminal history (‘q’ to exit) |
| tmux a -t <session name> | Attach to a detached session |
Developing on a Remote Machine
Since anyone could have been logged onto the machine before you, make sure to call git status and git pull to check the current branch and pull any updates. You should ensure you’re working on your own branch when on a shared machine. Also, make sure to commit any work-in-progress and push it before logging out, lest someone delete your work.
Code development on the remote programming setup is about as you would expect. Write some code, compile it using a call to make and upload it to your PCB using make upload. Feel free to code in Vim for that authentic experience, otherwise VS Code offers an excellent Remote - SSH extension which allows you to develop on a remote machine from inside VS Code. Just remember to launch up the terminal inside VS Code and perform the same tmux setup as described in Getting your Bearings.
Checking Connected Programmers
It’s possible to poll connected programmers from the command line using the pavr2cmd command. Call pavr2cmd --help to get a list of the valid commands. A few useful ones are summarized below:
| pavr2cmd -s | Get the status of the connected programmer |
| pavr2cmd –prog-port | Get the programming port of the connected programmer |
UART TX and RX on a Remote Machine
If you followed Setting up the Hardware, your target board should be connected to the /dev/serial0 port. This is the UART port mapped to pins 14 and 15 (BCM numbering) of the the Raspberry Pi. There is some setup involved in getting these pins to work as UART on a Raspberry Pi, but this should have already been done on your machine.
If you already have a good understanding of how to use a serial port in Linux, feel free to do it your way. Otherwise, this is the workflow that we recommend.
Getting Started
This method involves direct reads and writes from the /dev/serial0 file. Serial configuration is done using the stty command line utility. To make life easier, we’ve added a few macros to ~/.bashrc to make serial interaction easier.
To begin, call start_serial from the command line to set up the stty configuration. We also recommend creating a new tmux window or pane and splitting it to view TX and RX at the same time.
UART RX
Just call cat /dev/serial0 from the command line. This command should block if there’s nothing in the serial buffer, and display new lines as they come in. Hit Ctrl+c to quit RX.
In case you forget the port, we’ve also defined the $serial_port bash variable. So a call to cat $serial_port should have the same effect.
UART TX
We’ve defined the bash macro ws <some text here> to write to the serial port. For example, to send “Hello, World!” over the serial port simply call ws "Hello, World!" from the command line.
For context, ws is meant to be short for “write serial”. The macro is simply calling echo <some text here> > /dev/serial0 in the background to write to the serial port file.